How To Soundproof A Door - Part 1
door hardware framing soundproof door soundproof wall trudoor Nov 20, 2023I have done many articles over the years on soundproof doors. Lately, I have changed how I build them from my earlier videos. I am going to do a multi part series on door design and building over the next few weeks. Today will be all about framing the door and where to source your solid core doors.
1) Framing Your Doors
For this example I will be using two interior walls framed with a 1" air gap. The same principles apply if you are using a hat channel system on your walls or have one wall that is interior and one wall that is exterior.
Below is a diagram of how to properly frame a soundproof door. Most of the framing is consistent with normal construction, however we want to add an extra king stud to support each or our 140+ lb doors.
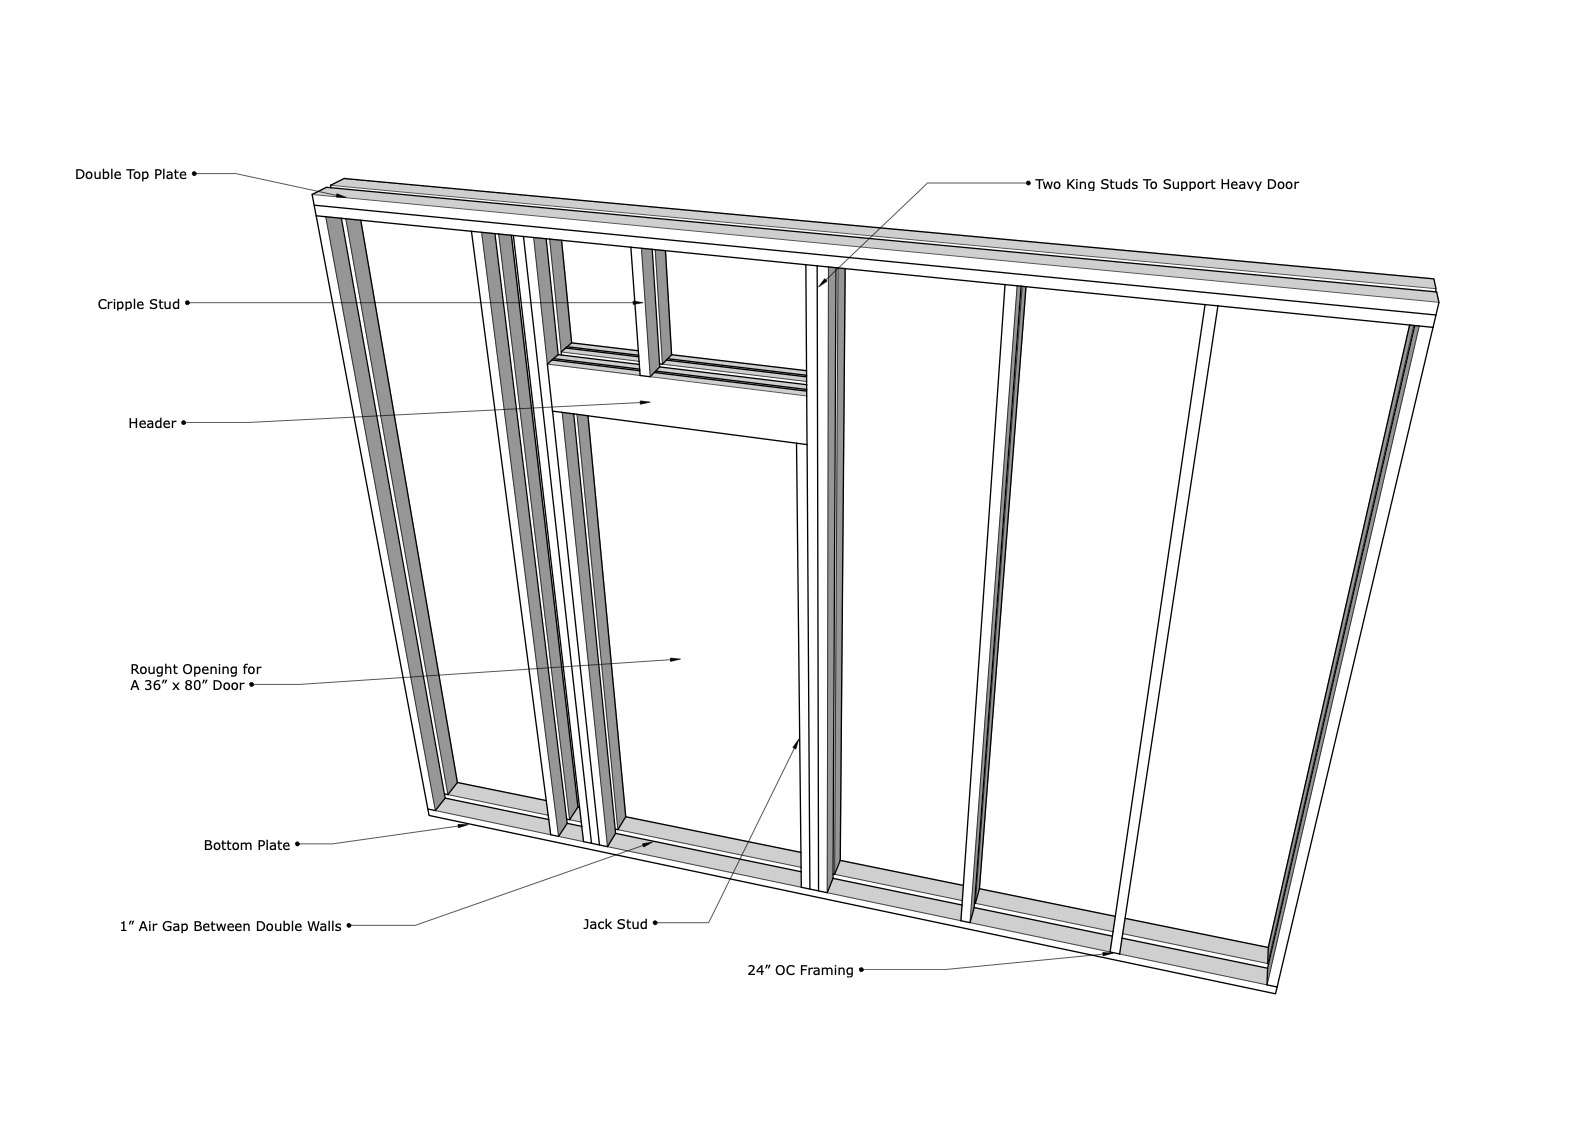
I would recommend 24" OC framing if your wall can handle it. You should calculate the max load your wall can handle before framing 24" vs. 16" OC. From a soundproofing perspective the less wood to transfer sound in anyway the better.
2) Rubber Seals and Sway Bracing
One very strange aspect of a double wall design is how to seal the air gap so that it is still soundproof, but also so that you don't smell or see into the wall cavity between your two doors. The solution is to use rubber. I recommend buying 1/16" x 8" rubber off amazon here in the states. This way your rubber seal will fit your two walls perfectly. Notice the diagrams below.

The rubber should be attached with screws and acoustic sealant to make sure it is airtight. I place the rubber on the outside king studs, because we will be using a prefinished steel door frame that will wrap around the inner jack studs and two layers of 5/8" drywall. The remaining gap between the rubber and inner door frame will be filled with 1" rigid Corning 703 insulation wrapped in Guilford of Maine Acoustic Fabric.
Notice I recommend placing the rubber on top of your header and under the cripple studs. This will cover the 1" air gap at the top of your door. The bottom of the door will have a threshold and the studs will be cut away for entry.

To keep your walls from swaying with the weight of the door we need to add sway bracing to the interior walls. I like to use I-B3 clips from The Soundproofing Company. Place these clips every 48" OC on the top plate of your inside wall and connect it to the ceiling joists. This will still decouple your wall, but provide much needed support to your inner decoupled wall.
3) Doors and Door Hardware
Over the years, I have moved beyond the Rod Gervais book and have begun designing my own system for soundproof doors. This has led me to a great site here in the states called TruDoor. They have everything we need to order all the door parts in one place. The following is what I recommend for each door. Simply double the materials to get your communicating door system.
*If you don't live in the States then do your best to find these similar materials in your own market.
- Paint Grade Primed MDF Solid Core Door - $183
- Neoprene Rubber Strips - $27.89 (for 10')
- Cal-Royal NM Series Mortise Lockset - $206.96
- ABH A110HD Heavy Duty Full Mortise Concealed Continuous Geared Hinge - $85.05
- Pempko 2006STC Acoutic Latching Panic Saddle Threshold with Bumper Seal - $42.10
- Timely Pre-Finished Steel Door Frame - $130
- Zero International Heavy Duty Surface Mounted Automatic Door Bottom - $157.58
- Zero International 770AA Adjustable Perimeter Gasketing Acoustic Door Seal Set - $538.64
Total Door and Hardware Cost - 1,371.22
Total Entryway Cost = 2,742.44
If that number shocks you, then you probably have not researched pre-built soundproof doors. Custom Soundproof Doors can reach the $6,000-8,000 range. The lowest price I have found for a quality soundproof door is $3,260/door. So, you can cheap out on some of the items above, but it will sacrifice your level of soundproofing.
Lastly, this is part one of a multi-part series. The solid core doors only weigh 60 lb so, we will need to add weight to each door. This will add some more costs in materials. We will also need to go over how to install the doors and ensure they are airtight. Stay tuned for part two.
Are you ready to move from planning to building?
Book a Soundproof Planning Call to determine whether your studio is feasible, what it will realistically cost, and what path makes sense for your space.
Categories
All Categories #acousticcloud #acoustics #acoustictips #acoustictreatment #audioengineering #audioupgrades #basementstudio #basstraps #construction innovation #constructiontips #creativespace #dit #diyordit #diyprojects #diystudio #diystudiobuild #ductlessminisplit #garagestudio #homeimprovement #homepodcaststudio #homerecording #homerecordingstudio #homestudio #homestudiobuild #homestudiogoals #hometheaterdesign #hush frame rafts #hvacnoise #mcveyacoustics #mixing #musicindustry #musicproducer #musicproducerlife #musicproduction #musicroom #musicspace #musicstudiodesign #podcast #podcastlife #podcastsetup #podcaststudio #professionalaudio #quiet spaces #quiethomeoffice #quietroom #quietspace #recordingstudio #recordingstudiobuild #recordingstudiosetup #recordingtips #roomacoustics #silicone soundproofing #sounddesign #soundenhancement #soundisolation #soundproofceiling #soundproofdoors #soundproofing #soundproofingexpert #soundproofingformusicians #soundproofingmistakes #soundproofingresources #soundproofingtips #soundproofstudio #soundproofwalls #soundproofyourspace #studioacoustics #studiobuild #studioconstruction #studiodesign #studiodiy #studioinspiration #studiolife #studiosetup #studiosound #studioupgrade #vibration reduction #vocalbooth 1/4 wavelength rule 101 2025 studio build 2x4 3d model a237 resilmount clip absorption absorption coefficient access doors for hvac acoustic acoustic cauk acoustic caulk acoustic clips acoustic cloud acoustic construction acoustic cualk acoustic design acoustic design for contractors acoustic design strategy acoustic engineering acoustic fields acoustic foam acoustic gobos acoustic holes acoustic hvac acoustic insulation acoustic isolation acoustic materials acoustic panel lighting acoustic panels acoustic performance acoustic room design acoustic sealant acoustic soffit design acoustic treatement acoustic treatment acoustic treatment cost acoustic treatment tips acoustic ventilation box acoustics acoustics for garage studio acoustics vs soundproofing acousttic putty adu recording studio adu studio aes67 affordable recording studio affordable soundproofing affordable studio setup air space air speed calculation airflow airgap airlock airtight airtight construction airtightness amroc angled walls aoip apartment architect coordination architect vs soundproofing expert architect vs soundproofing expert home studio soundproofing atmos home studio atmos speaker setup audio engineering audio gear protection audio interface ethernet audio networking audio over cat5 audio over cat6 audio over ethernet audio recording gear audio setup audio studio wiring audiophile room design avb avb audio avoiding soundproofing mistakes backset backyard recording studio backyard studio baffle box baffle box construction baffle box design baffle box soundproofing baffle box tutorial baffle box ventilation baffle boxes balanced power systems base basement basement ceiling soundproofing basement makeover basement studio basement studio design basement studio soundproofing basics bass bass problems bass traps bedroom recording studio beginner music producers beginner soundproofing bid set plans block noise blueprints bolt area bonello criterion boner bottom plate brick budget budget soundproofing budget stage budget studio build build a home studio budget build a soundproof room build a soundproof studio builder building acoustics building soundproof windows buy vs build soundproof windows cad calculator california adu cantered walls carbon dioxide carpet glue cat5 cat6a cable cathedral ceiling studio cathedral ceilings caulking ceiling assembly design ceiling cloud panels ceiling height ceiling load capacity ceiling sound isolation ceiling support cfm cfm and fpm clarity call clean power for audio gear client projects client work clip and channel system cmu walls coincidence effect coincidence frequency comb filtering communicating doors compact studio design concrete concrete blocks concrete slab construction coordination construction documents construction plans contractor coordination contractor installation tips contractor vs designer contractors control control room design control room setup coordination cost cost-effective soundproofing creative freedom creative space creative studio lighting creative workspace cubic feet per minute custom acoustic treatment dante dante audio dante vs avb decibel levels decibel x decibels decibelx deciboard decoupled wall framing decoupling decoupling for soundproofing dehumidifier dehumidifier system diaphragmatic diaphragmatic absorbers diffraction diffusion diy diy acoustic panels diy baffle box diy mistakes diy music room diy music studio build diy music studio ideas diy recording studio diy soundproof boot diy soundproof office diy soundproof studio diy soundproofing diy studio diy studio build diy studio design diy studio mistakes diy studio setup diy studio soundproofing dolby atmos dolby atmos studio door door hardware door seals double pane windows double stud walls double wall double wall system double walls double-stud wall dream home studio tour drum lessons drum room drum room design drum room soundproofing drum soundproofing drums studio drywall drywall soundproofing duct sizing ducted mini split ducting ductless mini split ductulator ductwork eadphone mix troubleshooting electric guitar studio build electrical electrical design electrical in studios electrical plan for studios emi and rfi interference solutions energy recovery ventilator eq adjustment erv erv for home office erv for studio ventilation erv system ethernet ethernet audio setup europe existing ceilings existing floors existing walls exterior wall extreme soundproofing face velocity acoustics fiberglass fiberglass insulation firestops flanking paths floating ceiling system floating floor floating wall construction floating walls floor floor design flush mounted wiring flush mounting flush mounting speakers flutter echo foam foam panels foldback system framing free soundproofing guide freestanding acoustic panels frequencies fresh air frost king weather stripping furring channel garage garage conversion garage conversion studio garage studio garage studio build garage studio conversion garage studio soundproofing genie clips gik acoustics gik acoustics setup gobo panels green building green glue ground loops prevention guitar amp iso cabinet guitar room setup hardwood floor harwood floor hat channel hat channel system hat channel wall system hat channels hat channels and loft floating floor headphone mix system hearback vs behringer heating and cooling helmholtz resonators helmholtz slot resonator hi-fi listening room high performance build high performance room design hiring historic building studio home music studio home music studio setup home office soundproofing home office studio home recording home recording studio home recording studio build home recording studio build it like the pros home recording studio design home recording studio tips home recording tips home soundproofing home studio home studio acoustics home studio advice home studio build home studio construction home studio design home studio electrical setup home studio gear home studio grounding home studio guide home studio hvac home studio isolation home studio lighting home studio noise control home studio power solutions home studio setup home studio soundproofing home studio tips home studio transformation home studio vibe home studio wiring guide home theater home theater soundproofing how to build how to build a baffle box how to build a home studio how to build a recording studio how to soundproof how to soundproof a garage how to soundproof a room how to soundproof a studio hrv humidity hush frame rafts hushframe rafts hvac hvac design hvac for recording studios hvac for soundproof rooms hvac for studio soundproofing hvac for studios hvac noise control hvac sound isolation hvac soundproofing i-b3 ib-1 clips ib-3 clips icf indo window inserts insulated concrete forms insulation insulation comparison iso store doors isolated concrete slab isolated ground receptacles isolation clips isolation hangers isolation room design isolation system design jam room ideas junction boxes knauf ecose insulation laminate glass latent cooling load led lights for studio lede listening position listening room live room local codes log cabin louden low frequencies manual j calculation studio mason industries masonry mass mass air mass resonance mass and airtightness mass decoupling airtightness mass loaded vinyl mass spring mass system master handbook of acoustics mastering mastering studio metal roof mini split mini split hvac mini-split hvac studio minisplit mistakes mitsubishi mixing mixing and mastering mixing low end mlv modes moisture mold monitors mortise lockset mortised lockset mr cool music production music production setup music production space music production studio music production studio build music room inspiration music studio build music studio construction music studio design music studio humidity control music studio inspiration music studio setup music studio tips musician productivity nc levels nd isolator clip neighbor noise solutions new zealand no permit studio build noise blocking techniques noise criteria noise criteria curve noise criterion curve noise isolation noise reduction noise reduction ventilation noise-free home studio noisy neighbors non-environment room not diy hacks outsulation assembly owens corning 703 permits philip newell philips hue studio setup pipewrap planning stage plans plaster play drums anytime plywood podcast podcast studio at home podcast studio setup poly barriers polyurethane foam portfolio power conditioners for studios practice room prefrabricated shed pretty good house prevent sound leakage pro studio build proaudiola producer professional home studio professional soundproofing professional studio build professional studio design tips professional studio lighting putty pads q-sys q-sys by qsc qrd 13 quadratic residue diffuser quiet home quiet hvac for studio quiet hvac for studios quiet hvac system quiet ventilation quiet workspace quietrock r value rebond foam recording room tips recording session tips recording setup tutorial recording studio recording studio acoustics recording studio at home recording studio build recording studio cost recording studio design recording studio door recording studio electrical recording studio guide recording studio hvac design recording studio old building recording studio planning recording studio setup recording studio soundproofing recording studio tips recording studio without permits recording tips redco reduce noise at home reflection free zone rehearsal room relative humidity remote work setup resilient channel resilient channel vs genie clips revit rew rfz risc clips rock wool insulation rockwool rockwool safe and sound rockwool vs fiberglass rod gervais roof room acoustics room modes room ratios room size room software room treatment room within a room room within a room calculator room within a room soundproofing safe n sound sand sand filled saxophone practice room sbir scandinavian studio design scatter plates schroeder diffuser sensible cooling load sepmeyer serious intent shed shed studio build shielded cable setup show house silent ventilation system silentfx drywall simple soundproofing single pane windows sketchup sliding door small rooms small space studios small studio setup snakes soffit mounting speakers solid core door solid core doors sonarworks sonopan sooundproof soudproofing sound isolated room design sound isolation sound isolation calculator sound isolation case study sound isolation design sound isolation for studios sound isolation planning sound isolation systems sound isolation techniques sound isolation tips sound reflections sound transmission sound transmission class sound treatment soundbreak soundgrid soundgrid waves soundid reference soundproof soundproof air vent soundproof beam soundproof beams soundproof bedroom soundproof booth soundproof budget soundproof ceiling soundproof ceilings soundproof construction soundproof curtains soundproof door soundproof door cost soundproof door installation soundproof door seals soundproof doors soundproof doors and walls soundproof drum room soundproof ducts soundproof expense soundproof fails soundproof floor soundproof floors soundproof garage soundproof garage conversion soundproof glass soundproof home office soundproof hvac soundproof materials soundproof method soundproof on a budget soundproof pipes soundproof room soundproof room design soundproof shed soundproof sliding glass door soundproof studio soundproof studio airflow soundproof studio build soundproof studio design soundproof studio ideas soundproof studio planning soundproof studio shed soundproof studio tour soundproof underlayment soundproof wall soundproof wall assemblies soundproof wall assembly soundproof walls soundproof window soundproof window insert soundproof window installation soundproof windows soundproof workshop soundproof your studio soundproofing soundproofing basics soundproofing budget soundproofing calculator soundproofing cons soundproofing contractor soundproofing cost soundproofing cost estimator soundproofing costs soundproofing design soundproofing diy soundproofing education soundproofing expert soundproofing failures soundproofing for musicians soundproofing fundamentals soundproofing garage soundproofing garage door soundproofing insulation soundproofing materials soundproofing mistakes soundproofing mistakes to avoid soundproofing myths soundproofing on a budget soundproofing pros soundproofing small rooms soundproofing stores soundproofing strategy soundproofing techniques soundproofing tips soundproofing walls soundproofing workshop soundproofing101 sounproofing space saving soundproofing speaker calibration speaker placement spl meter splayed walls spray foam spys designs staggered studs standing waves star grounding star grounding tips stc stc rating stc rating windows stop neighbor noise structural engineering studio acoustic treatment studio acoustics studio acoustics vs soundproofing studio architect studio audio setup studio budget studio budget planning studio build studio build cost studio build guide studio build journey studio build mistakes studio build tips studio builder studio builder tips studio building studio building guide studio building tips studio case study studio construction studio construction budget studio construction cost studio construction guide studio construction planning studio consultation studio contractor studio design studio design & planning studio design electrical studio design mistakes studio design plans studio design process studio design tips studio designer studio electrical design studio electrical plan studio electrical setup studio engineering studio gear guide studio headphone setup studio hvac studio hvac coordination studio hvac design studio hvac system studio interior design studio layout studio layout inspiration studio lighting design studio lighting ideas studio lighting tips studio locations studio monitors studio planning studio planning & layout studio power solutions studio project planning studio project readiness studio readiness studio renovation studio setup studio setup tips studio sound isolation studio sound quality studio soundproofing studio soundproofing tips studio tips studio tour studio ventilation studio ventilation ideas studio wall design studio window sound isolation studio wiring studio wiring best practices studio workflow superheavy door surface mounted wiring surge protection for audio equipment surround sound sway bracing team tecsound tempered glass threshold install time vs money tl transformer power conditioning triple leaf efffect trudoor trunk rubber tuff shed conversion ups for home studios vapor barrier vapor open assemblies vapor variable membrane ventilation vocal booth vocal booth acoustics vocal booth design vocal studio voice over studio voiceover studio volkman voltage regulation for studios wall wall noise reduction wall soundproofing walls weight whisper room vocal booth wic wilson acoustics wilson harwood window inserts wood furring work from home xlr cables xlr over ethernet youtube youtube studio youtube studio acoustics youtuber zero international 367aa zero international 770aa perimeter seal zero international seals zoom meeting noise