I'm Turning My Backyard Building Into a $75,000 Professional Studio — Here Are the Plans
Mar 30, 2026The Danger Zone: Why the $50,000 Studio Is the Most Expensive One You Can Build
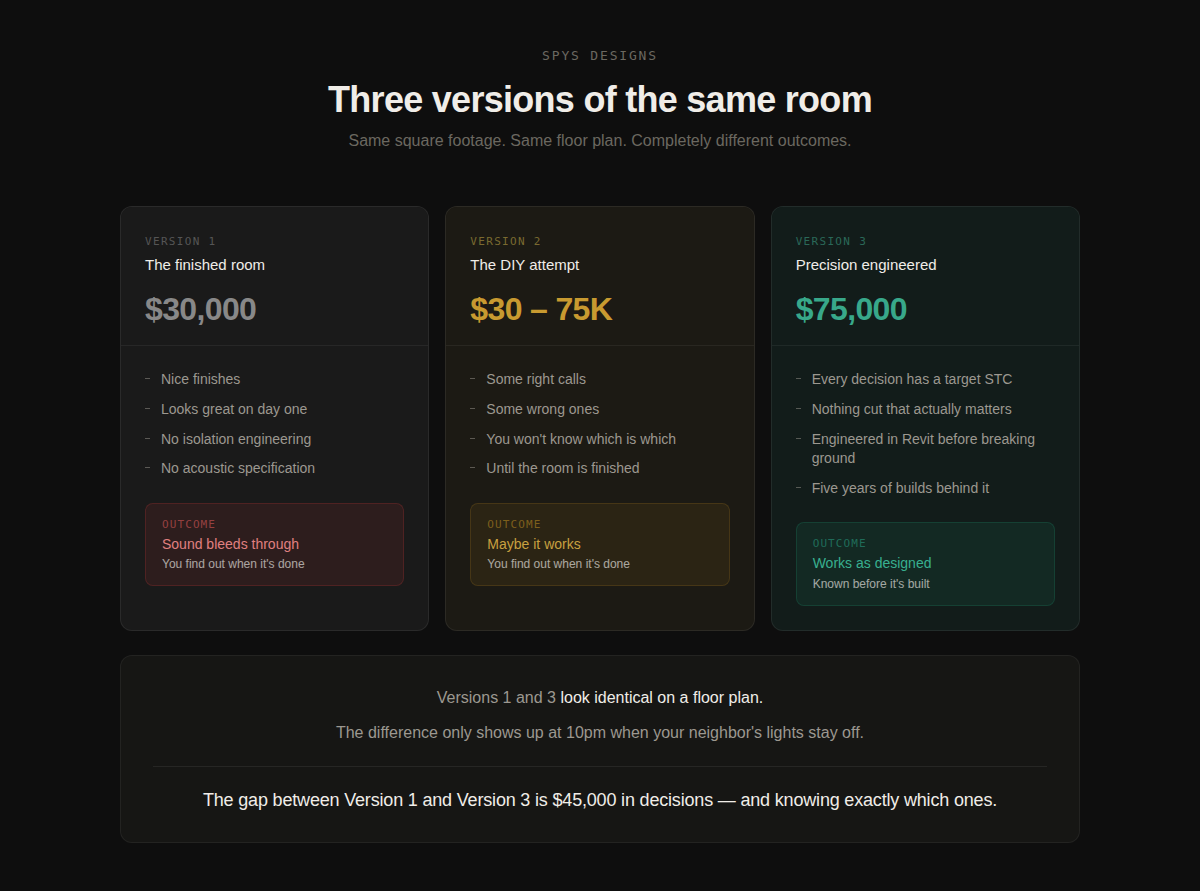
There is a version of this project that costs $30,000. There is a version that costs $75,000. And there is a version somewhere in between that ends up costing you more than either of them — not because of what you spent, but because of what you got.
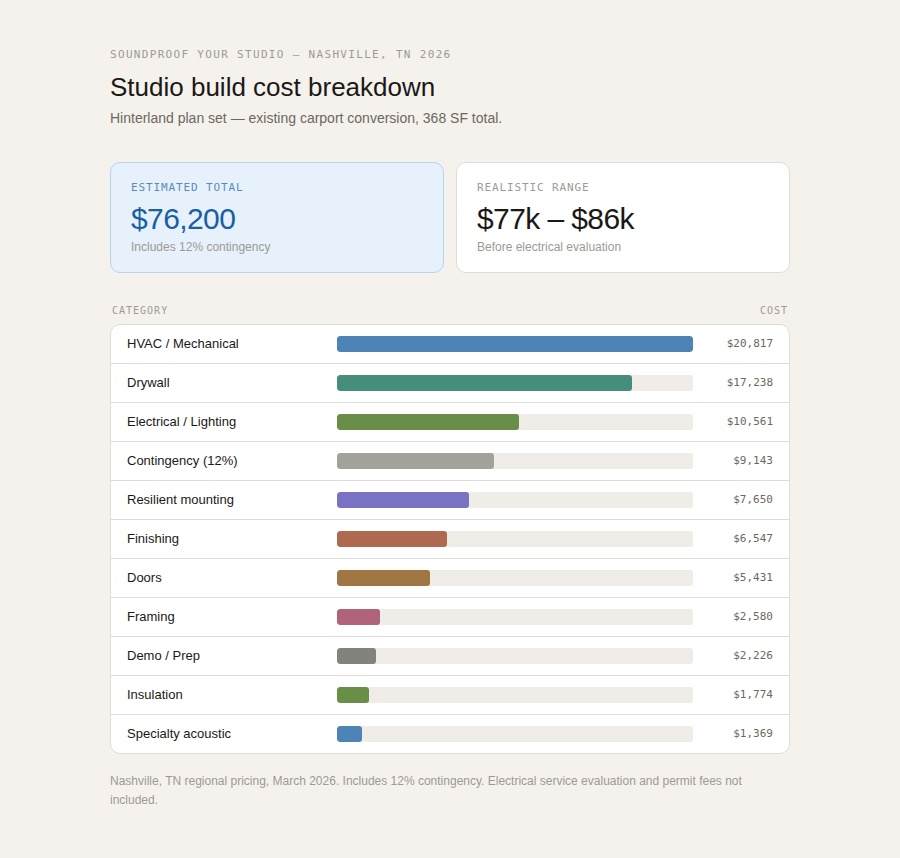
I just finished the construction documents for my own studio. It is a detached backyard building here in Nashville, 368 square feet, engineered from the ground up for professional sound isolation. The total build cost lands around $76,000. I have spent the last several months designing it the same way I design for clients — in Revit, with every assembly specified, every penetration detailed, and every decision tied to a specific acoustic outcome.
What I want to talk about is not the $76,000. I want to talk about what it takes to get there with certainty — and why the most dangerous place to be is not at the bottom of that range, but in the middle of it.
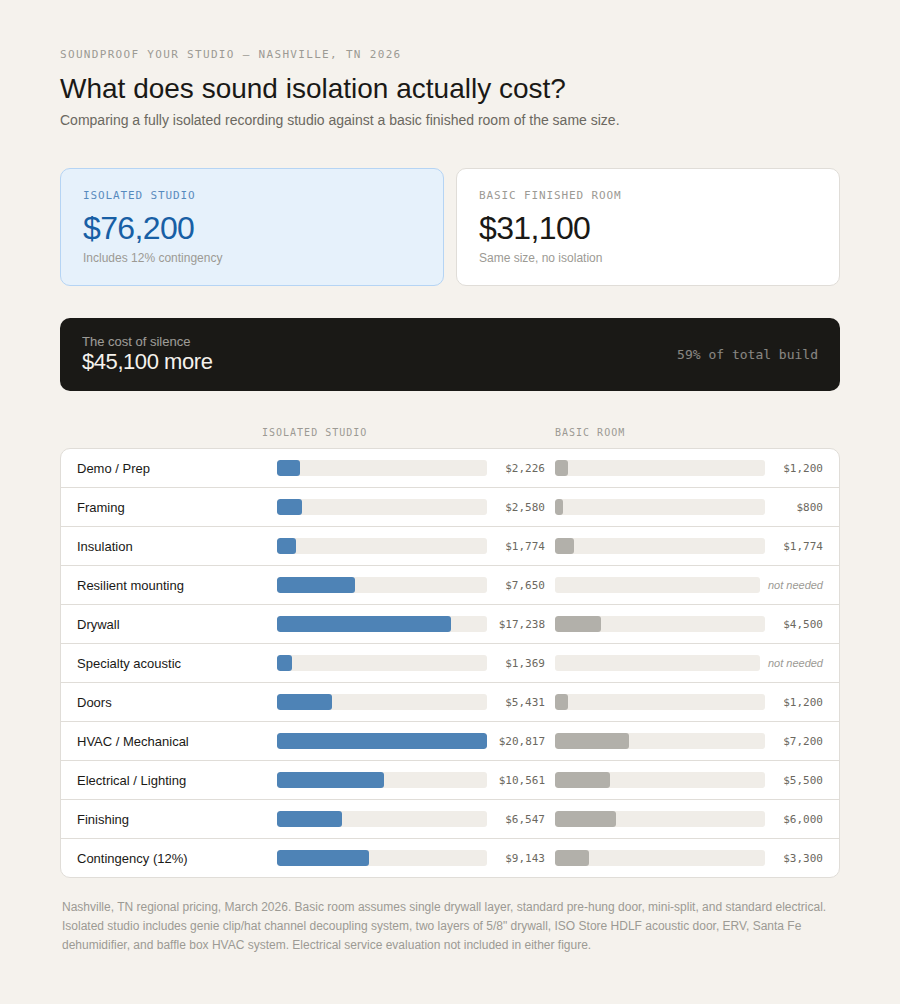
What Sound Isolation Actually Costs
The comparison above shows two versions of the same 368 square foot room. The basic finished room comes in at $31,100. It has drywall, a mini-split, standard electrical, and a pre-hung door. It looks exactly like a studio. It does not perform like one.
The professionally isolated studio comes in at $76,200. The difference — $45,100 — is entirely in the decisions that are invisible on a floor plan. Resilient mounting. Two layers of 5/8 inch drywall with proper mass and decoupling. An ISO Store acoustic door instead of a built one. An ERV paired with a dedicated Santa Fe dehumidifier. A baffle box HVAC system that removes the mechanical noise path entirely.
That $45,100 is not luxury. It is the cost of knowing that what you build will work before you build it.
The Problem With the Middle
Here is what most people do not account for when they start planning a studio build. They start at $30,000, learn a little, add some isolation attempts, and end up somewhere between $40,000 and $65,000. They used the right products in most places. They watched the YouTube videos. They told the contractor what to do.
And when they finish, they find out whether it worked.
That is the fundamental difference between a DIY isolation attempt and an engineered one. It is not the materials — most people eventually find the right materials. It is the sequencing, the detailing, and the connections between systems. Sound does not care that you got the wall assembly right if a single screw is bridging your exterior stud wall and interior isolation layer. It does not care that you installed a quality door if the frame is not properly isolated from the surrounding wall. It does not care that you specified the right ERV if you did not account for what that ERV does to humidity in a Nashville summer.
I know these things because I made most of these mistakes myself.
What Six Years of Builds Actually Teaches You
The ERV problem is a good example. An energy recovery ventilator is the right solution for fresh air in a sealed room. It exchanges air with minimal energy loss. What it does not do, on its own, is handle the latent humidity load in a hot, humid climate. In a Nashville summer, you will run that ERV and the room will get sticky. The solution is a dedicated dehumidification system running in tandem. A Santa Fe dehumidifier paired with the ERV solves it. But you only know to spec that combination if you have lived through the problem — or if someone who has already done it details it in the plans before you break ground.
The door is another one. Building an acoustic door from scratch feels like a cost savings. In practice, it rarely is. The labor to build a properly sealed, properly massive door almost always exceeds the cost of buying an engineered one. The ISO Store door I specified for this build comes pre-engineered with the mass, the seals, and the hardware to perform at the STC target without a custom fabrication process. It is in the plans as a specified product, not a field decision.
The drywall connections are the one that costs people the most. The entire logic of a decoupled wall assembly is that the inner layer of drywall never touches the structure. Genie clips and hat channel create a mechanical break between the framing and the finish layer. One screw through the wrong location — at an outlet box, at a light fixture, at a ventilation penetration — creates a rigid connection that bridges the decoupling you just paid for. Every penetration in these plans is detailed individually. Not because I am being precious about it, but because I have seen what happens when you leave those details to the field.
What the Plans Actually Do
The point of engineering construction documents in Revit is not to produce paper. It is to convert unknown unknowns into known decisions. Every question that would otherwise get answered on the job site — with a guess, with a shortcut, with whatever is easiest that day — gets answered on the drawing instead. Before the first cut. Before the first fastener.
Version 1 of this room costs $30,000. It is a nice room. It will not isolate sound at any meaningful level because that was never designed into it.
Version 3 costs $75,000. Every dollar above $30,000 is accounted for in the drawings, specified in the assembly details, and tied to a measurable acoustic outcome.
Version 2 is the one that keeps me up at night on behalf of clients. It costs somewhere in between, the budget expanded as problems were discovered, and nobody knows whether it is going to work until it is finished.
The plans are how you skip Version 2 entirely.
Why I Designed My Own Studio This Way
I could have done this cheaper. I know how to cut corners — I know exactly which ones to cut and which ones will cost me later. I chose not to cut any of them, because I am going to use this room professionally, and I already know what it feels like to finish a build and wonder whether it is going to perform.
The Enscape renders show what this becomes. The Revit documents show how it gets there. The gap between those two things is not a contractor's best guess — it is a set of specifications that answer every question before anyone picks up a tool.
If you are planning a professional studio, voice over room, home theater, or any space where sound isolation is the point, the Sound Isolation Site Assessment is the right place to start. It takes about five minutes and tells you what your project actually needs before you spend a dollar on materials.
Sound Isolation Site Assessment Plan
Are you ready to move from planning to building?
Book a Soundproof Planning Call to determine whether your studio is feasible, what it will realistically cost, and what path makes sense for your space.
