
The Builder Asked Me to Change My Own Design. Here's What I Kept
Sep 14, 2026SOUND ISOLATION DESIGN · SPYS DESIGNS
Redlining a Sound Isolation Plan Set: Which Cuts Are Free, and Which Ones Cost You
A builder in Colorado sat down with a plan set we had spent months developing for a detached backyard studio and asked whether he could take some things out of it to bring the cost down.
That is a normal conversation. It happens on most projects. What made this one worth writing about is that he was right about some of it, he improved the design in two places I had not thought of, and on one item I still am not fully convinced he is right. I made that change anyway.
This is what that process actually looks like from the design side, and why the answer is almost never a clean yes or no.
What was on the sheets before the builder saw them
The project is a detached studio in Colorado, Climate Zone 5. Low-slope shed roof. The isolation strategy runs on a deep, fully filled roof cavity and a heavy, sealed outer leaf, with the interior ceiling decoupled on clips.
Roof, as drawn
- 24 gauge standing seam metal
- High-temperature, vapor-impermeable self-adhered underlayment
- Upper deck of 3/4" CDX plywood
- 2x4 sleepers at 24" O.C. forming a vented cavity above the primary deck
- Two layers of 3/4" CDX plywood as the primary deck
- 16" I-joists, BIBS netted fiberglass, full cavity fill, deck contact required
- INTELLO Plus variable vapor retarder across the underside
- GenieClip RST with two layers of 5/8" drywall
Exterior wall, as drawn
- Two layers of 23/32" OSB as the outer leaf
- Fully adhered, vapor-permeable weather-resistive barrier
- 3/4" pressure-treated wood strapping at 16" O.C., forming a vented rain screen
- Siding, client to select
- Two layers of 5/8" drywall on the interior face
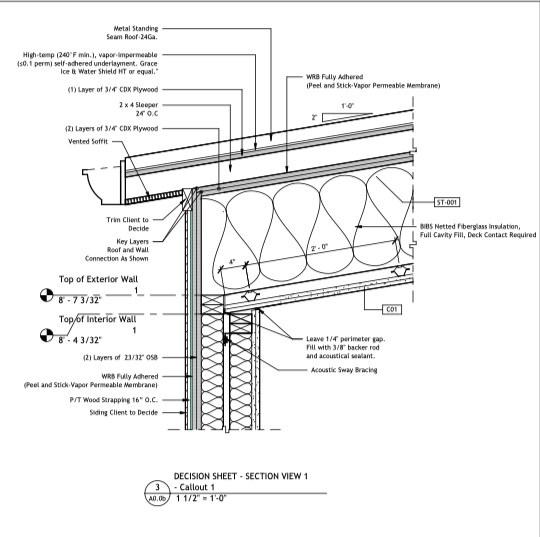
"The wall-to-roof connection as originally specified."
|
Everything on those lists is doing a job. The question a builder asks is which of those jobs the client is actually paying for. |
Cut one: the metal roof
The builder asked to replace the standing seam metal roof with asphalt shingles. On a roof this size that is a meaningful number, and it was the largest single line item on his list.
Two things are worth understanding before anyone celebrates the savings.
First, the underlayment requirement does not disappear with the metal. At the slope this roof runs, asphalt shingles sit near the low end of their permitted range, which means continuous coverage across the deck is still required. What changes is that the underlayment no longer has to be rated for the temperatures a metal roof reaches. The savings is real, but it is a savings on the roofing, not on the roofing plus everything underneath it.
Second, and this is the part that surprises people: this cut is acoustically neutral to slightly favorable. Architectural asphalt shingles weigh more per square foot than 24 gauge standing seam. Swapping them in makes the outermost layer of the roof heavier, not lighter. Mass on the outer leaf is generally working in your favor.
Verdict: take it. This is a cut that saves real money and does not compromise the isolation strategy.
Cut two: the rain screen
The builder asked to delete the 3/4" pressure-treated strapping behind the siding. His reasoning was straightforward and came from experience: Colorado is dry, and he does not detail rain screens on the homes he builds there.
Here is where I want to be careful, because the name of the assembly is misleading. The strapping is not primarily there to stop rain. It is there to create a vented gap so the wall can dry outward. Our own general note on the drawings says exactly that: the gap must remain open and unobstructed at the top and bottom of every wall, and it must not be filled, because that is the wall's drying path.
There is a second consequence that is easy to miss. In this climate zone, a vented cladding assembly over wood structural panels is what supports using a Class III interior vapor retarder, which in this case is simply latex paint. Remove the vented gap and you have not just deleted a material. You have changed the reasoning that justifies the interior side of the wall.
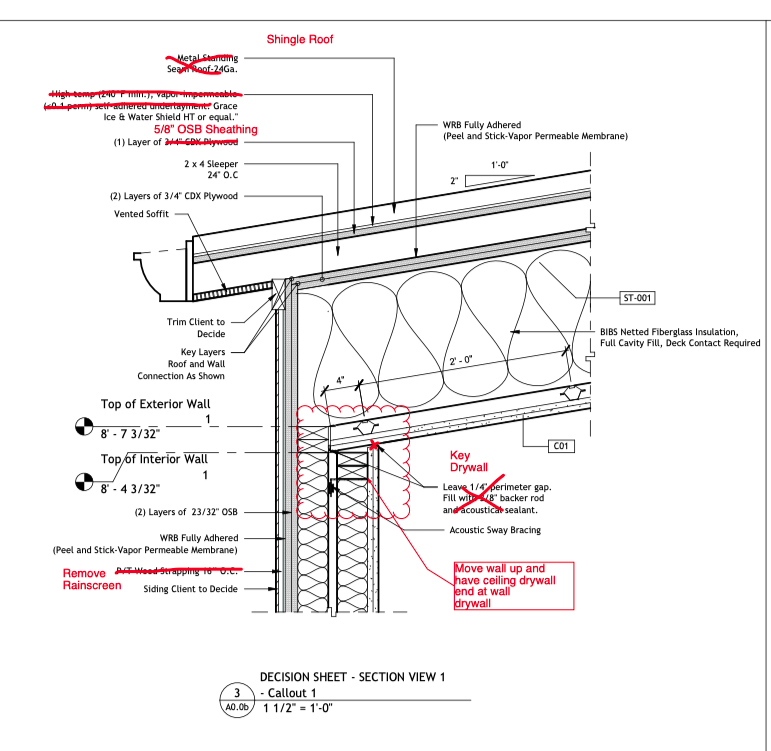
"The same detail after the builder meeting. Rain screen struck, roofing changed, ceiling drywall termination revised."
So what did I do? I made the change.
He builds in that climate every week and I do not. Deferring to local experience is a defensible thing to do, and holding a line purely because it was my line is not a good reason to spend a client's money. What is not optional is documenting it. When the strapping came off the drawings, the general note describing the drying path had to come off with it, or the plan set would contradict itself. A drawing that says one thing and a note that says another is worse than either version on its own.
|
I still think the gap earns its keep. I also think the person who builds in that climate every week gets a real vote. Both of those things can be true, and the plan set has to say which one won. |
Cut three: the variable vapor membrane
The third item was the INTELLO Plus smart vapor retarder across the underside of the roof cavity. The membrane exists to limit how much interior moisture can reach the cold underside of the roof deck during winter, while still permitting the assembly to dry inward when conditions reverse.
The client does not use a humidifier, has never used one, and does not plan to. Without an added winter moisture load, the risk this membrane manages drops substantially. On that basis, removing it is a defensible decision, and I agreed to it.
But this cut is different in kind from the other two, and it is worth being precise about why.
The metal roof decision changes a material. The rain screen decision changes an assembly. This one changes what the assembly depends on. After this cut, the roof's moisture safety margin rests partly on how the room is used rather than entirely on what is built into it. Habits change. Owners change. A future occupant who runs a humidifier through a Colorado winter is not doing anything unreasonable, and they will have no idea that a membrane was removed on the assumption that they would not.
So this one goes in writing, with the condition attached to it. Not as a disclaimer, and not to protect myself. It goes in writing because the next person who owns this building deserves to know what the assembly assumes about them.
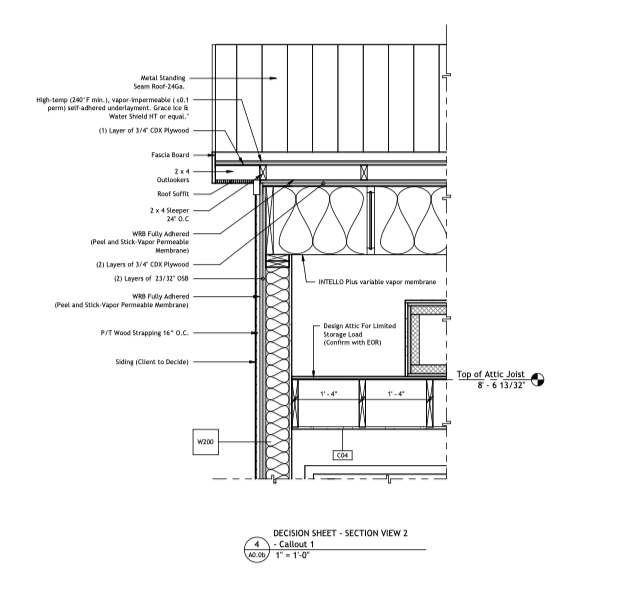
"Original eave detail showing the INTELLO Plus membrane and the vented rain screen."
|
|
|
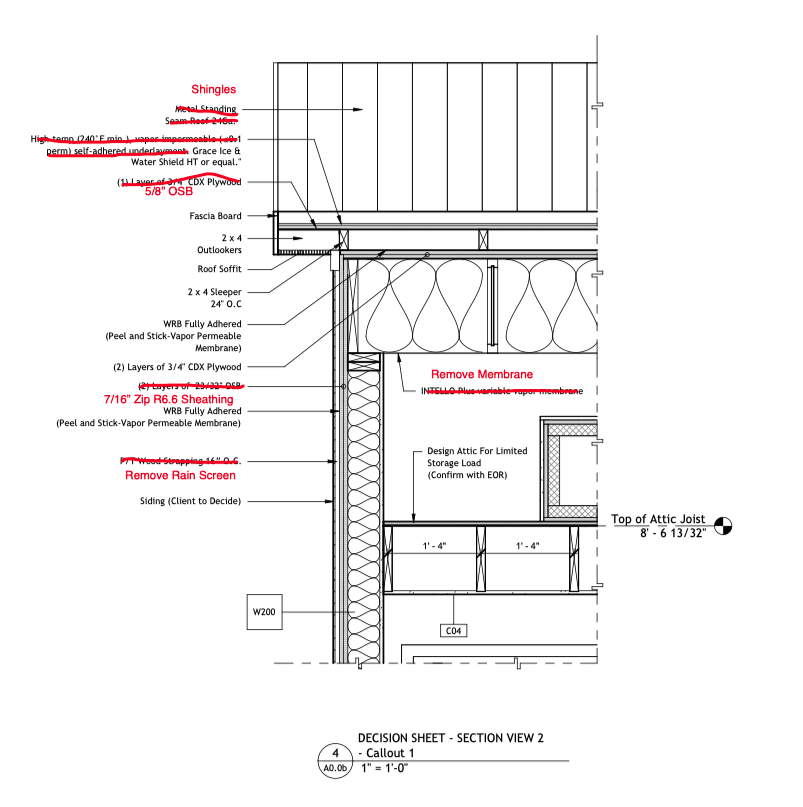
"The same eave after redlines. Membrane removed, rain screen removed, sheathing changed to Zip R6.6." |
Two changes that made the design better
The parts of this meeting worth the most were not the cuts. They were the two places where the builder improved a drawing I had already signed off on.
Extend the slab flush with the sheathing
He asked us to run the slab out so its edge lands flush with the exterior sheathing rather than stopping short of it. His reasoning was practical: it gives him a clean, continuous surface to seal at the base of the wall, and it removes a small ledge where moisture and insects can find their way into the assembly.
He was right. That is a better detail than the one I drew, and it came from someone who has sealed that junction in the field hundreds of times more than I have.
Zip R6.6 sheathing on the walls outside the isolation system
He also flagged that certain walls would not meet energy code as drawn, and asked for 7/16" Zip R6.6 insulated sheathing on those specific assemblies.
This one is interesting because the answer depends entirely on which walls we are talking about. Insulated sheathing puts a compressible foam layer between the sheathing and the framing. On a wall that is part of the isolation system, that introduces a soft intermediate layer in the outer leaf, which is something you generally do not want. On the kitchenette and toilet walls, which are outside the isolation system entirely, it is simply the correct product for the code requirement.
The builder scoped his request to exactly the right walls. That is not a coincidence. That is what happens when the person building the thing has read the drawings carefully.
One drafting note that came out of it, because it matters more than it sounds like it should: 7/16" Zip R6.6 has an actual assembled thickness of one inch. It has to be modeled at one inch in Revit or every dimension that references that wall is wrong downstream.
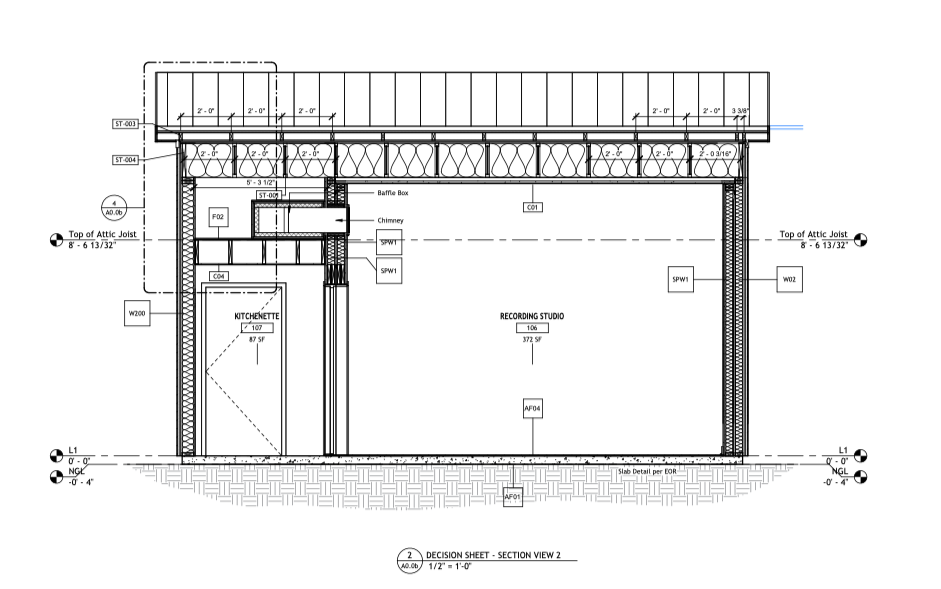
"Building section as issued for the builder meeting."
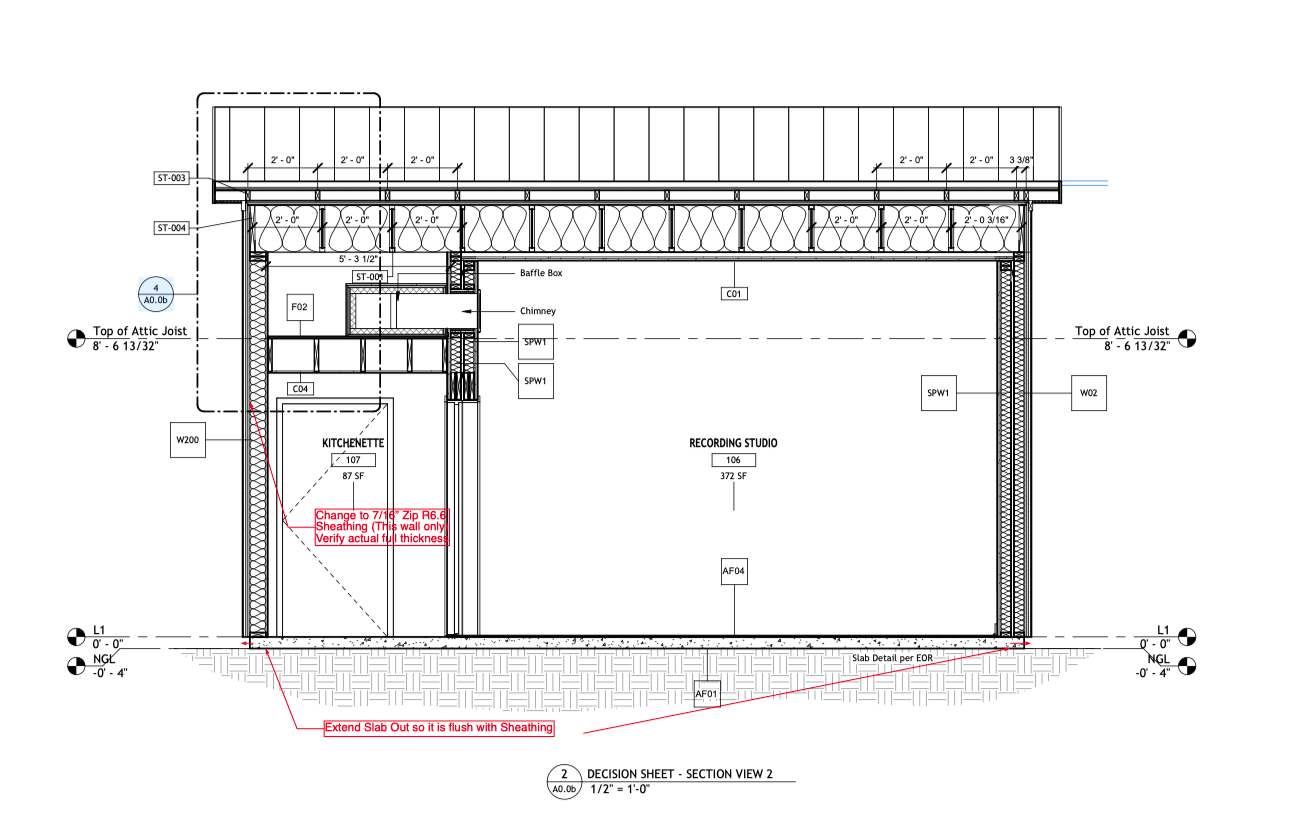
"The same section after the meeting, including the slab extension and revised sheathing."
The line that does not move
Look at what actually changed across all five redlines and a pattern shows up.
|
CHANGE |
INSIDE THE ISOLATION SYSTEM? |
CALL |
|---|---|---|
|
Metal roof to shingles |
No — outer finish layer |
Accepted. Neutral to favorable acoustically. |
|
Rain screen removed |
Partially — affects the isolation wall's drying path |
Accepted with documentation. The one still under review. |
|
INTELLO membrane removed |
No — but changes what the roof depends on |
Accepted with a written condition on humidification. |
|
Slab flush with sheathing |
Adjacent — improves the base seal |
Accepted. Better than the original detail. |
|
Zip R6.6 on non-isolation walls |
No — deliberately scoped away from it |
Accepted. Correct product, correct walls. |
The 16" roof cavity did not move. The full BIBS fill with deck contact did not move. The GenieClip RST ceiling assembly did not move. The double-layer OSB outer leaf did not move. The sealed perimeter details did not move.
Not because I dug in. Because that is the part of the drawing the client is actually paying for. Everything else on those sheets exists to support it, and support layers can be argued about.
The rain screen is the honest complication in that framing, and I am not going to pretend otherwise. It sits on the isolation wall, and removing it changes how that wall manages moisture over a span of decades rather than years. That is why it is the item I am still thinking about, and why it is documented rather than quietly deleted.
|
A cut that saves money is not the same as a cut that is free. Part of the job is knowing which one you are being offered. |
Why this is the argument for bringing a designer in early
Every decision described here was inexpensive to make while it was still a line on a drawing.
At least two of them would have been expensive or effectively impossible to change later. The slab edge is poured once. The sheathing choice is buried behind siding and drywall within days of going up. If that meeting happens after framing instead of before it, the energy code gap becomes a correction notice, and the slab detail becomes a compromise that everyone lives with.
This is also why the common assumption about what we do is wrong. Sound isolation design is not a layer added to the inside of walls that already exist. It determines framing depth, structural loading, roof assembly, vapor strategy, and where the slab edge lands. When it arrives at the end of a project, it fights the building. When it arrives during design, it shapes it.
The most valuable version of this meeting is the one that happens before the drawings are final, with the builder and the isolation designer in the same room, going line by line and being honest about which lines are load-bearing and which are preferences.
|
Planning a room that has to perform at this level? Start with a Sound Isolation Site Assessment. It is a structured look at your project, your site, and your constraints, and it is designed to surface the expensive problems while they are still cheap to solve. |
SPYS Designs · soundproofyourstudio.com · Nashville, TN
Are you ready to move from planning to building?
Book a Soundproof Planning Call to determine whether your studio is feasible, what it will realistically cost, and what path makes sense for your space.
